How to Upload From Past Courses on Canvas
While instructors cannot change the level of access available after the course concludes, instructors are able to edit the course earlier the form decision date is reached.
This guide provides instructors for the post-obit in club to change levels of postal service-term pupil admission:
---------------
A. Grant boosted admission to the course by extending the specified end date
B. Limit User Participation Dates
C. Restrict access to class content
---------------
ALL Inverse MUST Be COMPLETED Earlier THE CURRENTLY SPECIFIED END DATE OF THE Sheet Form
A. Grant boosted access to the course by extending the specified end date
This action will allow students to continue to have full-access to the course based on an stop date that the teacher defines.
This can exist done at any time during the course scheduled dates, just it must exist done before the course end date every bit specified inside Campus Solutions.
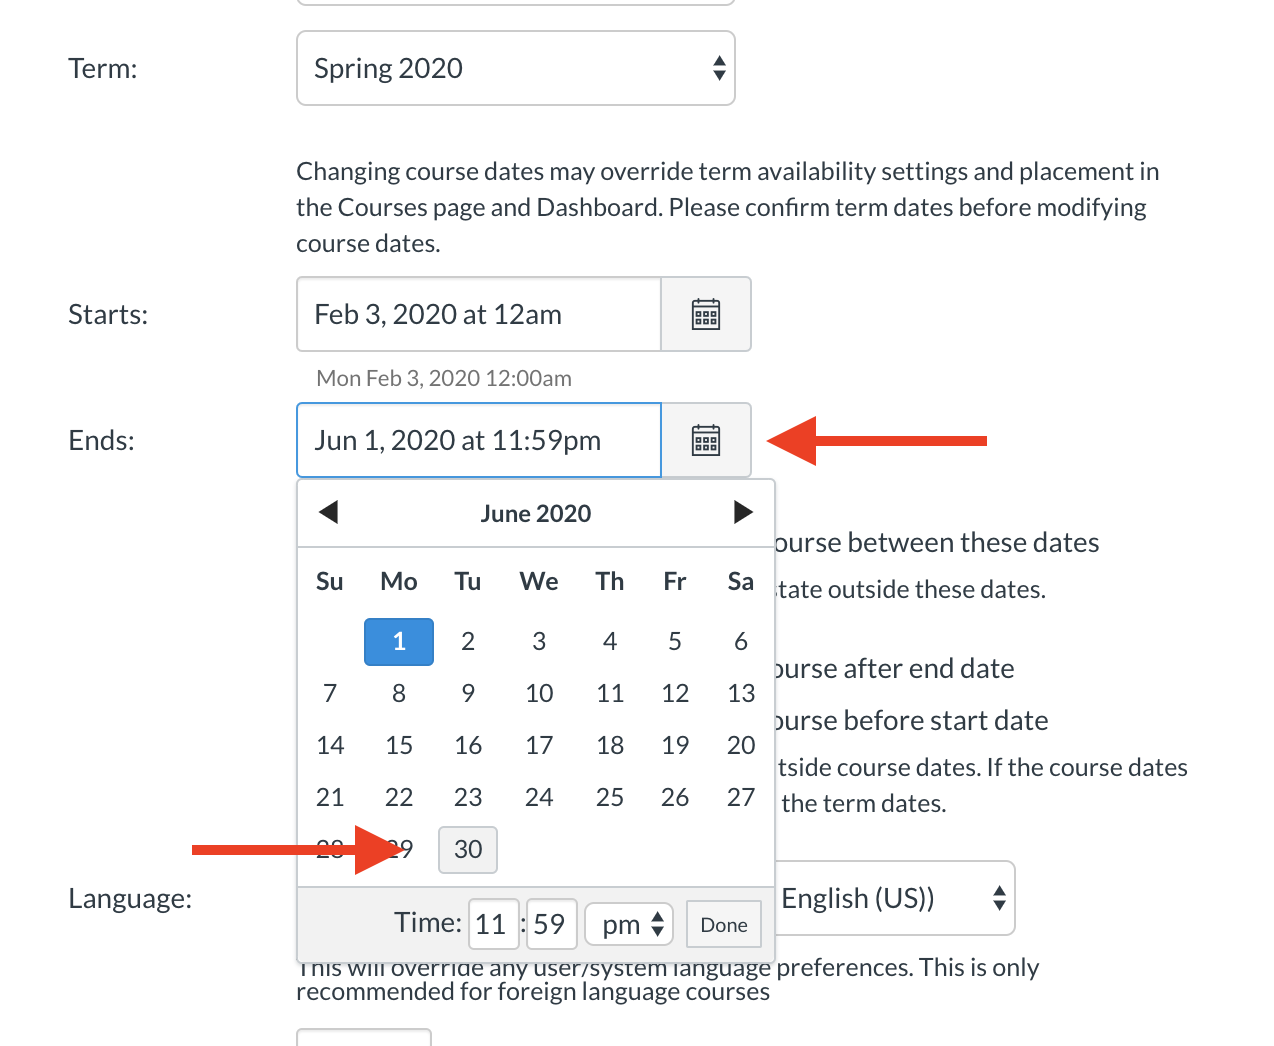
1. Extend the Existing Stop Date
a. Click on Settings listed at the lesser of the grade carte du jour
b. Get to the Course Details tab
c. Refer to the Course Start and Stop dates section
d. Click the "ENDS" calendar icon. Select a new end date for the form.
e. Relieve by clicking the blue "Update Class Details" push button located at the bottom right hand corner of the page
B. Limit User Participation Dates
You can set whether or not students can only participate in the course during the specified course dates using the Student Participation checkbox. Participation means that students tin submit assignments, post discussions, upload files, or take part in whatever other action-based task within a grade. If you limit students to merely be able to participate during the form dates students can admission the course, and look at content, but they cannot fully participate until the first day of the course. When the course is concluded, the course is placed in a read-just state.
This can be done at any time during the course scheduled dates, but it must be washed before the course end date equally specified inside Campus Solutions.
This is a two-footstep process: Instructors need to limit the form participation dates and the visibility.
1. Restrict Participation Dates
a. Click on Settings listed at the bottom of the class card
b. Become to the Form Details tab
c. Brand sure that the correct start and finish dates for the electric current course are set in the calendar boxes
d. Check the box marked "Users can just participate in the course between these dates"
e. Save by clicking the bluish "Update Grade Details" button located at the lesser correct hand corner of the page.
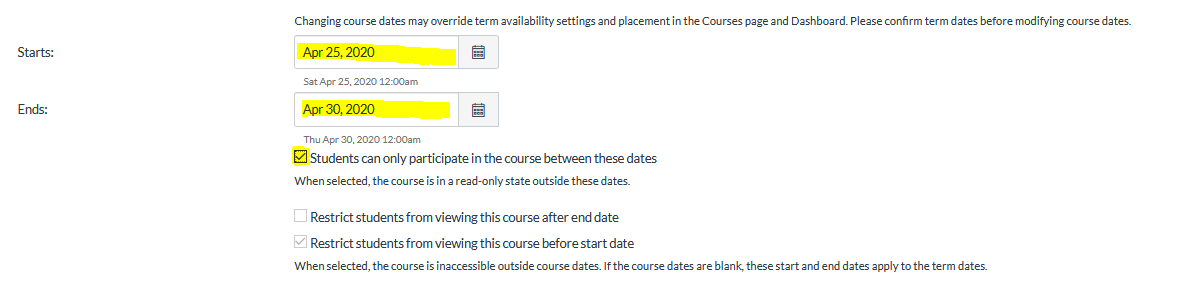
two. Brand the Course Invisible to Students After the End Date
a. Click the cheque box "Restrict students from viewing course after the end date"
b. Save past clicking the blueish "Update Class Details" push button located at the bottom right hand corner of the page.
C. Restrict admission to class content
Instructors can choose to hibernate unabridged content areas (like Quizzes or Discussions), individual modules, or files. These actions will hide some parts of the course, while keeping others accessible.
Instructors cannot unpublish individual assignments, discussions, or quizzes if pupil work has been submitted. If instructors wish to restrict access to any one of these items, they must hide the unabridged content surface area from the form bill of fare.
Some items may exist accessed from multiple content areas. For example, if an teacher hides the Assignments area, only shares a link to an private assignment in Modules, students will be able to admission the material through Modules.
Instructors should use Student view to bank check that all content they wish to hide from students is inaccessible.
ane. Hide content areas from the course menu
a. Click on Settings listed at the bottom of the course menu
b. Click the third tab "Navigation"
c. Motility the content areas you wish to hide into the lower portion of the screen. Yous can do this by dragging and dropping the proper name of the content area or by clicking the gear icon and selecting either "disable" or "move"
d. Click the blueish relieve push button located at the bottom of the page
For more details, please refer to the following Canvas Community Guide for information on how to manage Class Navigation links.
https://community.canvaslms.com/docs/Dr.-12933-415257079
2. To restrict admission to an private module
a. Get to the Modules content expanse
b. Next to the title of the module yous wish to hibernate, click the dark-green checkmark once to un-publish the module. This volition make all items contained within that module invisible.
c. Changes volition be saved automatically
Please refer to the following Canvas Community Guide for more data on how to publish/unpublish a module.
https://community.canvaslms.com/docs/DOC-26427-how-do-i-publish-or-unpublish-a-module-equally-an-instructor
iii. Bank check our work in Student View
a. Click on Habitation
b. Refer to the Homepage sidebar located in the right-hand column and click on "Student View".
c. Make sure the form looks the way you lot would like it to look for your students
d. Leave Student View past clicking on the "Leave Pupil View" push located in the bottom correct-hand corner of your screen
Please refer to the post-obit Canvas Community Guide for more than data on how to use the Student View feature from within a Canvass course.
https://community.canvaslms.com/docs/DOC-26310-how-practise-i-view-a-course-as-a-examination-student-using-student-view
Source: https://www.sdccd.edu/about/departments-and-offices/instructional-services-division/online-learning-pathways-1/faculty/past-enrollments-canvas.aspx
Post a Comment for "How to Upload From Past Courses on Canvas"